
As precision medicine advances, clinicians and diagnostic labs face an ever-increasing volume of genetic data and analytical complexity. Meeting this demand requires tools that streamline data management and automate bioinformatic workflows to deliver timely, accurate diagnoses. By bringing data management, diagnostic workflow automation, and reporting into a single platform, VSWarehouse 3 provides the foundation that laboratories need to scale precision medicine.
VSWarehouse 3 is designed to centralize genomic operations, and this post focuses specifically on installation and setup in the cloud. Although on-premises server installation is always an option, we thought it worthwhile to address cloud installation in this post, because it’s typically considered more involved and intimidating for labs to set up a server on the cloud. Our team recognized that pain point and transformed what generally is a multi-week infrastructure effort into a guided and reproducible cloud server deployment, without turning your environment into a black box. You bring your own AWS or Azure subscription, and Golden Helix provides the guidance and user-friendly installation scripts to give your group the power to create your own secure cloud server environment for secondary and tertiary analyses.
Bring-Your-Own Cloud
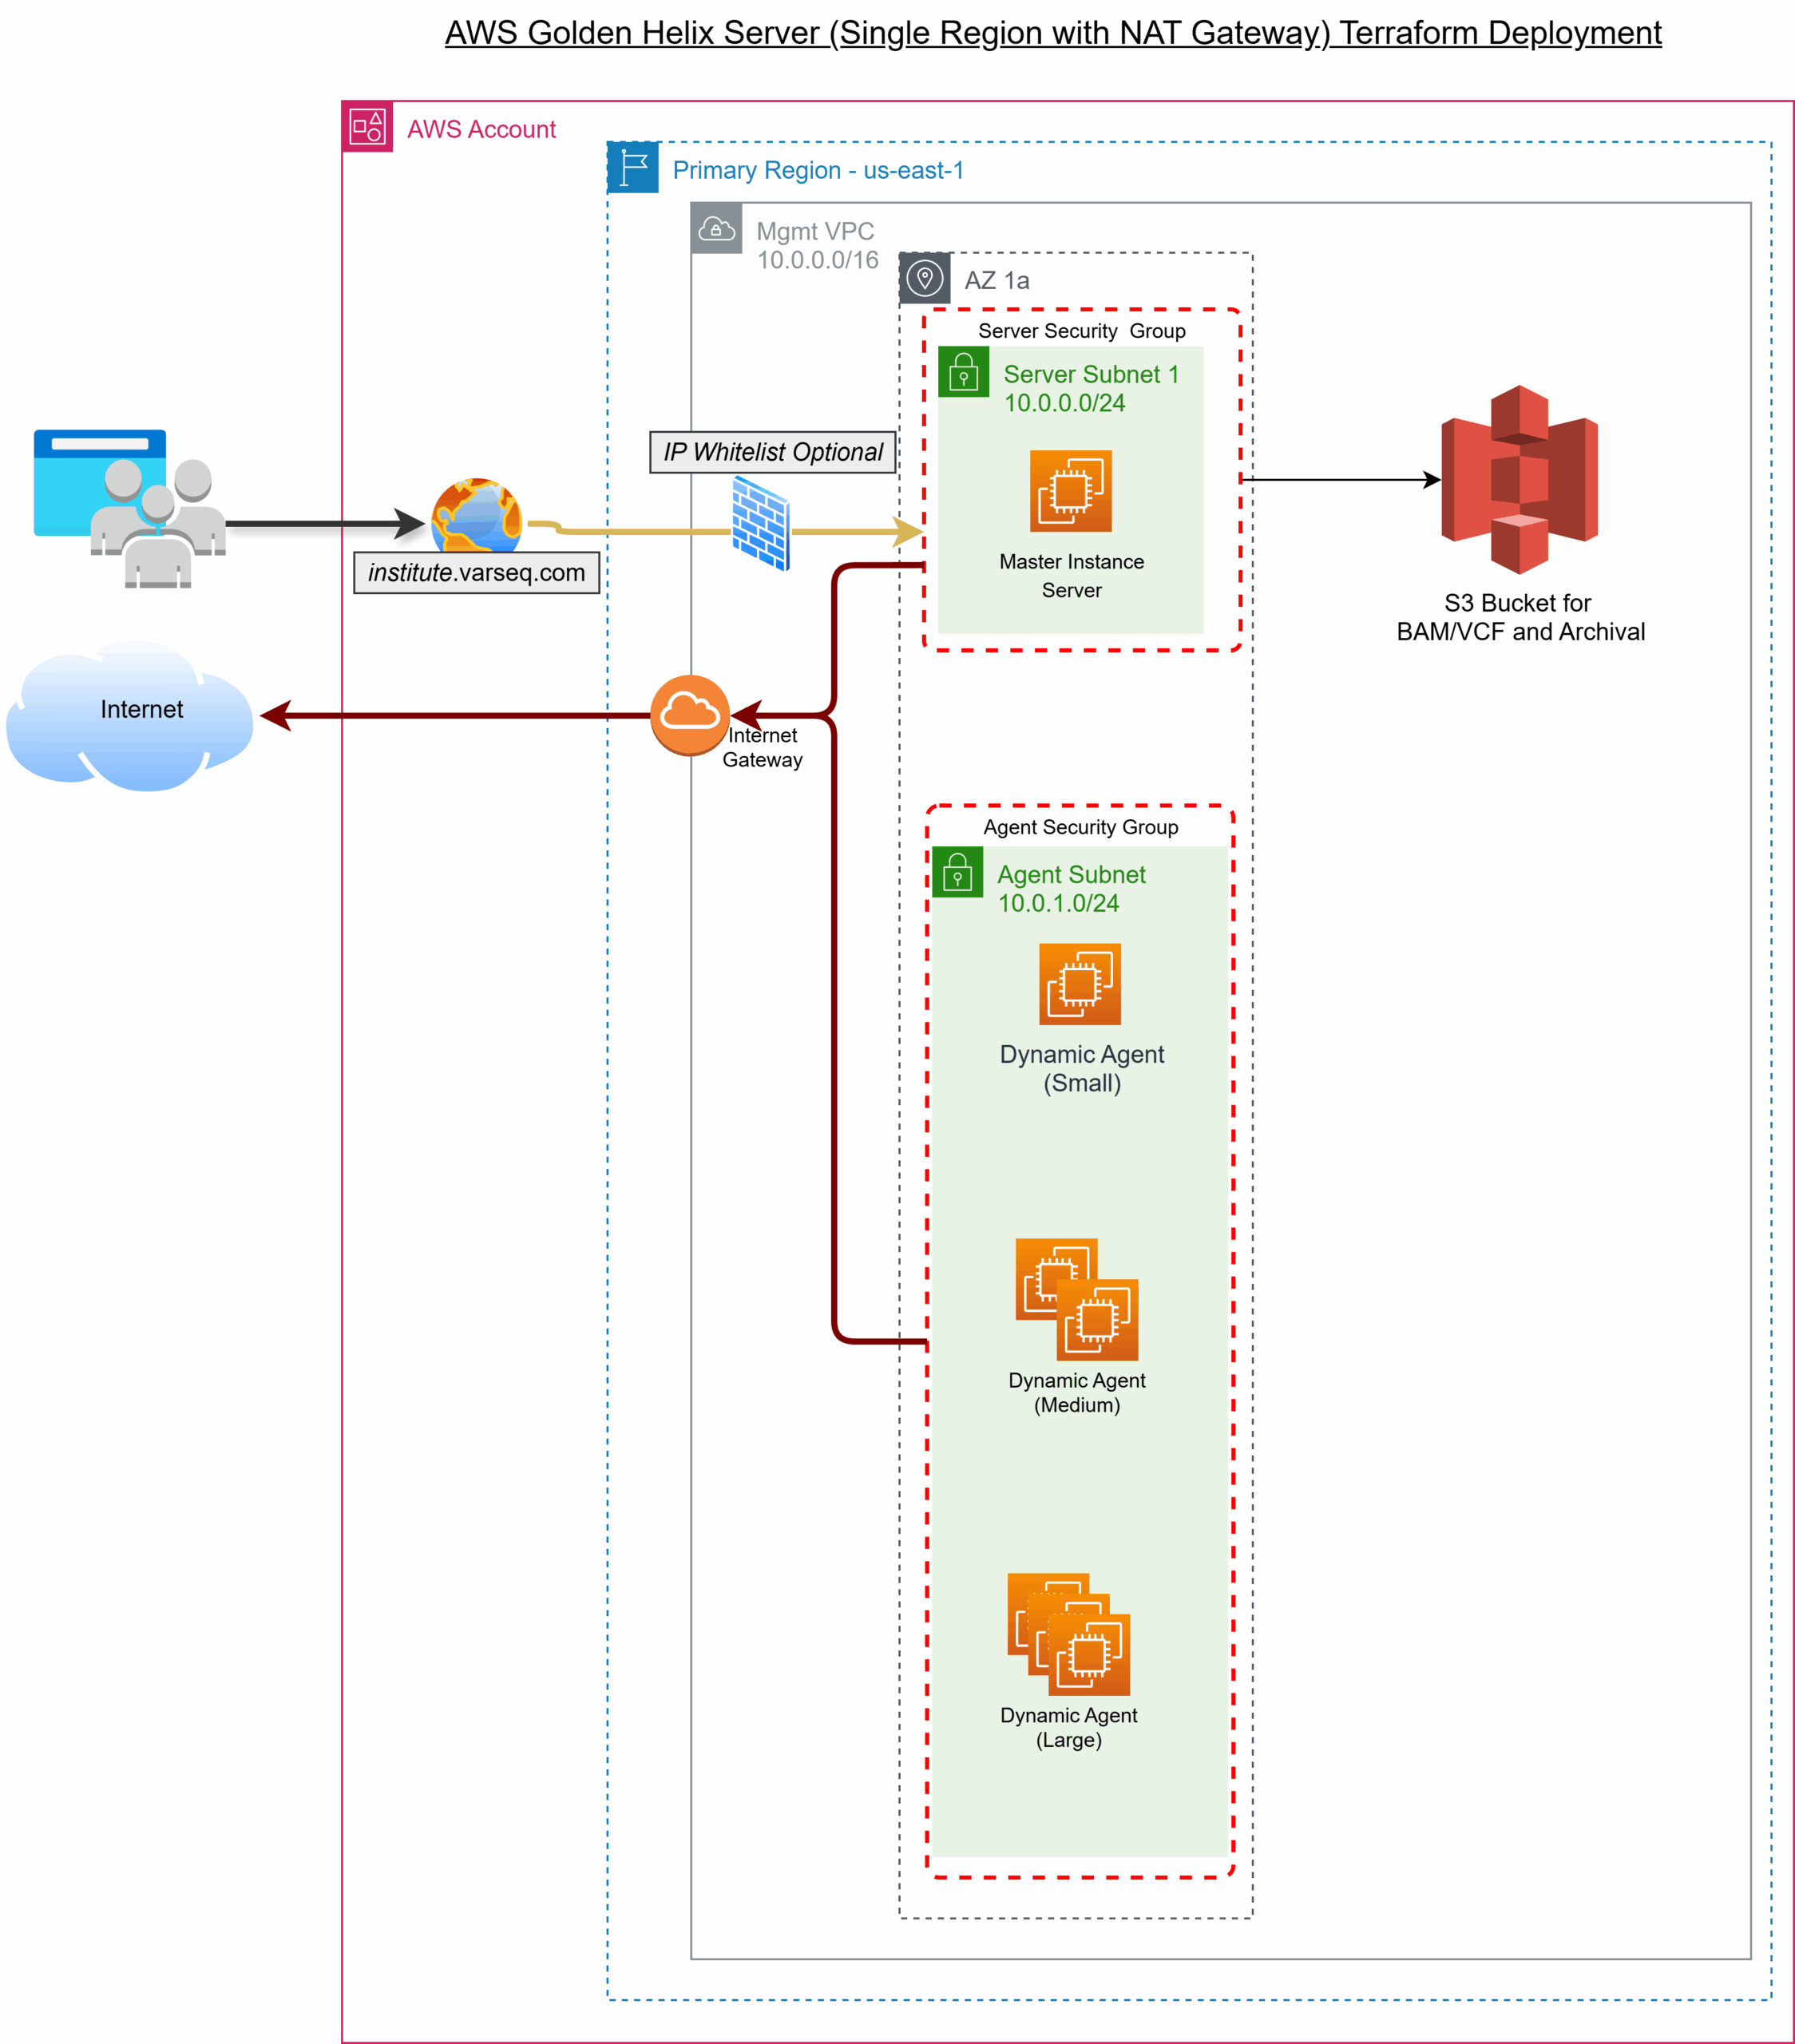
The shape of VSWarehouse 3 cloud deployment is transparent and easy to reproduce. The deployment creates a simple, single-region setup in your AWS or Azure account with a straightforward hub-and-spoke pattern: at the center is the Golden Helix Server, which acts as the main control point (the “hub”). At the same time, additional “agent” machines can be spun up as needed to run applications like VarSeq or VSCode and to execute automated bioinformatic pipelines (the “spokes”). Those agents are spun down when not needed to conserve costs. The server is given a public web address with secure HTTPS access, while agents remain on a private network and connect back securely to carry out assigned jobs. Storage can be attached natively with S3 on AWS or Blob Storage on Azure. This design avoids bottlenecks and makes it more efficient to handle large genomic files like BAMs or whole genome VCFs.
Guided Provisioning
Installation starts with deployment scripts that automate much of the heavy lifting, following the “infrastructure-as-code” approach. The server deployment includes Terraform/OpenTofu configurations for AWS and Azure, with bootstrapping scripts to get you off the ground quickly. A small set of well-organized and clearly documented configuration files is edited up front to inform the deployment and customize your environment.
You then log into your cloud account and let the deployment scripts create the server. When that’s finished, you’ll be directed to your institution’s site for VSWarehouse 3 (e.g., https://your_institution.varseq.com). The system automatically handles DNS updates and SSL certificates by using the varseq.com subdomain that comes with your license. If you prefer your own domain, you point it to the new server’s address and provide your own certificate (or fall back on a self-signed one). Either way, secure HTTPS access is enabled by default, providing encrypted and secure access to your server.
Transparency and User Control
Once live, VSWarehouse 3 is not a black box. Administration is handled through a browser-based Admin Console, where you can check service health, review logs, schedule reboots, and perform upgrades without leaving your browser. This gives teams an approachable way to keep the system running smoothly, and it also minimizes the common pit-falls of manual server management.
For those who want more direct control during day-to-day administration, the Admin Console provides a command-line tool, ghadmin, installed with the server. This tool makes the full administrative functions available: adding or disabling users, creating or modifying workspaces, managing agents, etc. Everything is documented and accessible with built-in help, so administrators can look up available options.
Together, the Admin Console and the ghadmin tool give you flexibility. Bioinformaticians and IT staff can keep things highly automated or step in to adjust compute settings, fine-tune security policies, adjust configuration files, etc.
Secure and Aligned with Your Policies
Because you deploy into your AWS or Azure account, your standard controls apply. Network access to the server is constrained by Security Groups, which act as virtual firewalls controlling allowed inbound and outbound traffic. Most labs start by allowing HTTPS from a short list of office/VPN IP ranges, limiting SSH to administrative subnetworks. Identity policies add another layer of control, letting you restrict what actions users or services can take and under which conditions. Agents running applications and workflows can be kept in a private subnetwork with no inbound public access. It’s a direct route to security without overly complex administration.
Storing Your Genetic Data Gracefully and With a Plan
Genomics workloads accumulate data quickly, so the deployment encourages using lifecycle policies. On S3, rules can transition older results to cheaper classes or expire intermediates. On Azure Blob, policies move data between hot, cool, cold, and glacial archive tiers. That keeps the long tail of storage under control without so much hands-on curation. You retain full visibility and control because these rules live in your account alongside your buckets or containers.
What Do You Have to Prepare, and What Do Our Install Scripts Provide?
While no cloud deployment is literally “one-click” our team has created the tools for you to deploy in one sitting, and we will join a call with you and walk through every step. Remember, this is your cloud account and your server – we just designed the infrastructure.
You bring a few essentials to the table: a cloud account with the right permissions, a domain name, and email (SMTP) details so the server can send password resets and security alerts. You’ll also need a Golden Helix license key and registry credentials, and optionally SSO information if you want to connect via single-sign-on with your institution’s identity provider. These are routine setup items for regulated environments.
The deployment takes care of the heavy lifting for you: creating the VPC (AWS Virtual Private Cloud) or VNet (Azure Virtual Network) with subnets and routing, setting up DNS records and TLS termination, provisioning the master server, defining agent profiles and images, mounting secure cloud storage, enabling backups, and configuring the first workspace. That’s a lot accomplished using our reproducible code in a single setup script. From there, the Admin Console keeps routine operations simple, while leaving the door open for fine-tuning by IT teams or bioinformaticians when needed.
Blast off!
In practice, deploying VSWarehouse 3 in the cloud gives you a clean, repeatable path from an empty subscription to a fully operational environment. Bringing your own cloud offers clear advantages for automation and storage. You maintain ownership of both the environment and the data, while Golden Helix provides the scaffolding and administration tools. The result is less time spent managing infrastructure and more time generating diagnostic results and reports.
VSWarehouse 3 brings the entire Golden Helix suite into a scalable environment. And if cloud isn’t your preference, the same server can be deployed on-premises. We’re here to support you wherever you choose to deploy VSWarehouse 3. Want to learn if VSWarehouse is the right tool for your team? Contact our team today!
Documentation of the installation process in our Server Docs. More detailed documentation on our Server Deployment repository on GitHub.