The power of VSPipeline is in it’s ability to automate VarSeq workflows. Using VarSeq to create a pipeline template is great because it allows you to dial in the applied filters as well as interactively organize the annotations and applied algorithms. Automating a workflow with VSPipeline is straightforward when beginning with an existing project. However, there are several steps that can be taken to make the process even easier and give you more control over the final results. Here are a few…
Linking Tables
After creating a VarSeq project with the variant filters, annotations and algorithms of your choice, most of the heavy lifting is complete. However, before saving a template to use with VSPipeline, it is important to make sure the tables are linked to correct results in the filter chain, especially if you want to export multiple tables.
Clicking a variant count in the VarSeq filter chain will update an unlocked Variant Table to the corresponding filtered variants. Next press the lock icon in the blue table filter toggle. This will lock the table to that location in the filter. The table will now display all variants that pass the filters up to the selected value. Additional tables can now be opened and linked by repeating this step for each filtered group you want to export.
By linking multiple tables to different paths in the filter chain, intermediary, and component results can be viewed at the same time. For example, one table could be configured to contain rare LoF variants that are the result of multiple filters while another could be the filtered results of ClinVar Pathogenic variants directly. These tables can be displayed, and later exported, separately.
Naming Views
After the tables have been linked it is a good idea to give them unique names that make them easy to reference with pipeline commands.
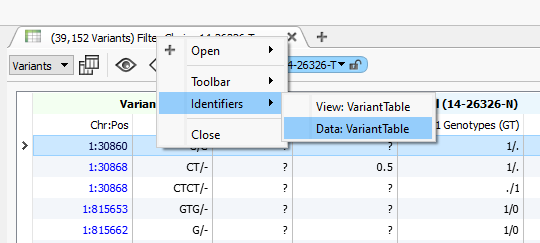
To change the name of a table right click on the title of the table and select “Identifiers” and then click on the “Data” identifier. This will allow you to reference different tables later on when it comes time to export the final results. For example, if you have selected tables for the variant affects, you might choose to name two tables “LofVariants” and “PathogenicVariants”.
Changing the Working Directory
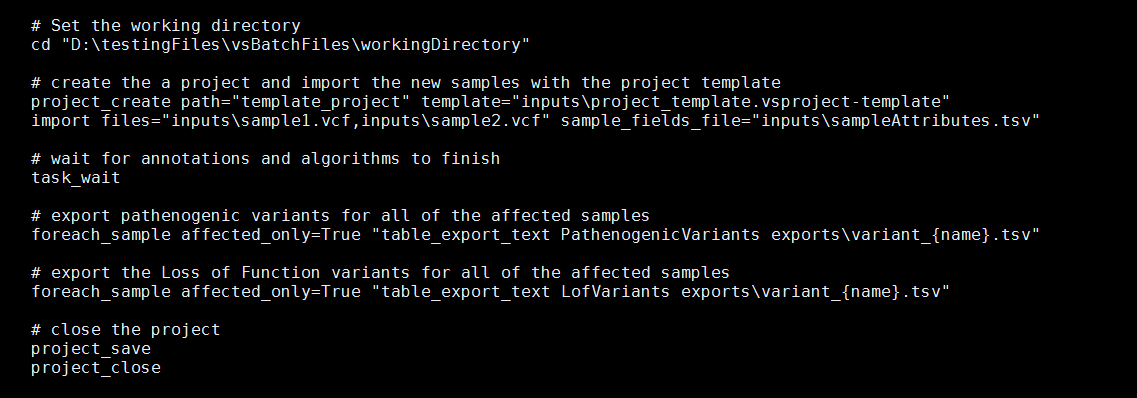
After saving the project as a template, the next step will be to organize the VSPipeline commands that will be executed, and incorporate the paths to the input and export. This often means typing or copy and pasting long and unwieldy file names. To get around this the “cd” command can be used to set the working directory which will be used to resolve all of the relative paths in any subsequent pipeline commands.
Not only can this make the subsequent pipeline commands easier to read, but it can also make it easier to change the paths when using new files in a different location, or when moving the execution of batch file from a testing to a production environment.
For-Each Loops
For-each loops are powerful VSPipeline commands. They allow for the iterative execution of commands over each of the samples in the project. The optional parameter affected_only can be set to “True” or “False” to exclude samples that were not set as affected during import. In the above example, an export is completed for the named tables “LofVariants” and “PathogenicVariants” for each affected sample in the project.
We try to make setting up and working with VSPipeline as easy and intuitive as possible. Hopefully these tips prove helpful as you get acquainted and start automating your VarSeq workflow. If you have any questions or you need help working with VSPipeline don’t hesitate to contact the Golden Helix Support Team.


