Unlocking the Potential of CRAM Files: The New VarSeq 2.3.0 Release for Enhanced Plotting, Coverage Analysis, and CNV Detection
The CRAM (Compressed Reference-oriented Alignment Map) file format was conceived in 2011 as a more space-efficient way to store alignment data. It saves space over the previous standard BAM (Binary Alignment Map) by only storing the differences between each read and the reference sequence. This results in large space savings as most bases for each sample match the reference.
The upcoming VarSeq 2.3.0 release supports CRAM files. This allows VarSeq to use CRAM files for plotting, as well as coverage statistics and subsequent CNV analysis.
Sequence Checksums
To ensure that the current reference sequence is the same as the one that was used to create the CRAM file, checksums are saved for each chromosome. These checksums are a unique fingerprint of all of the bases in the chromosome sequence. When reading a CRAM file, the checksums in the file are compared with the checksums in the available reference files. The checksums must match in order to decode the alignments in the CRAM file into the uncompressed reads.
Typically reference files are stored as FASTA files, but in the case of VarSeq, they can also be saved as TSFs. Using the TSF file format has the advantage of improved plotting speed, as well as being self-contained. For TSFs, all of the supplemental indexes, such as the fai and dict files that must be computed alongside the FASTA file are included in a single file.
Creating a TSF Reference File
If you have a reference file that is specific to your current pipeline, with segments or chromosomes that don’t match the shipped Golden Helix references, you can convert it to a TSF. To convert an existing fasta reference file to a TSF open the Data Source Library by going to [Tools] -> [Manage Data Sources…] in VarSeq. Then select [Convert…] to open the convert wizard.

Drag one or more fasta files containing the chromosome reference sequences that you would like to convert into the window and select [Next]. This will scan the segments in the selected files to get their names and lengths. Once this is finished, you will be prompted to select the genome assembly of the input. You should select the GRCh37 and GRCh38 build, depending on which build your custom FASTA file is based on. Note: Do not create a new assembly unless you are converting a FASTA for a new species (not in the assembly list). Creating a new assembly that matches the chromosome lengths of the GRCh37 or GRCh38 will break annotation matching for VarSeq in all future projects! [Next].

Fill in the source attributes with names that describe the assembly and source of the sequences. Click [Next] and confirm selected options are as expected and click [Convert] to start the conversion to tsf.

When the convert process is complete, you will have a reference TSFthat has all of the checksums computed as well as coverage information for plotting in Genome Browse.
Inspecting Reference Checksums
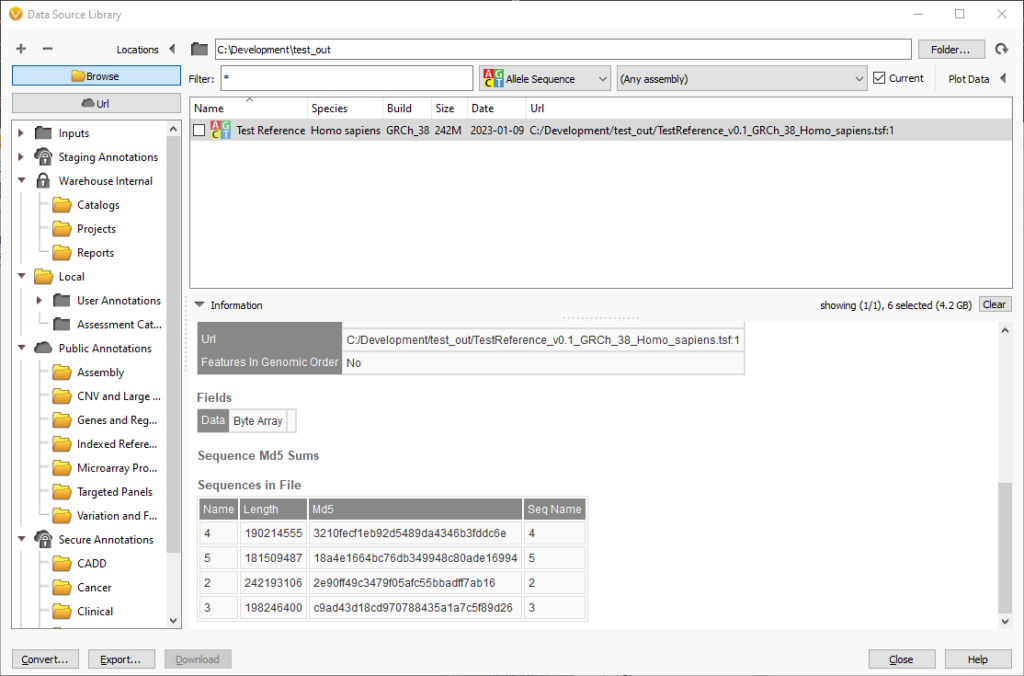
To inspect the reference checksums in reference TSFs (and fasta) files, you can use the Data Source Library.

The names of the chromosomes and the lengths and md5 checksums are in a table at the end of the source information. For fasta files the supporting fai and dict files must be next to the fasta file.
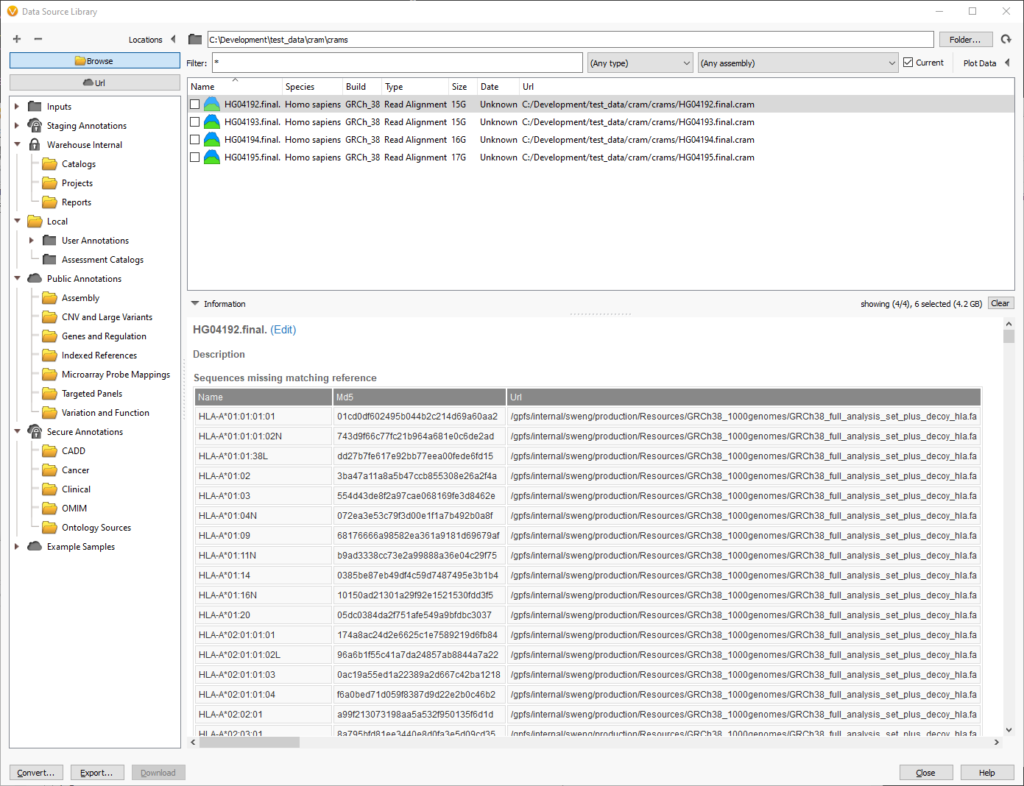
Likewise, you can also inspect the chromosomes and md5 checksums in cram files to see which reference sequence is required. If there are missing chromosomes, they will be displayed in the “Sequences missing matching reference” table:

In this example, the cram file is missing the reference sequence for the HLA regions. This is ok if the analysis does not cover these chromosomes or segments. These HLA regions are added as decoys to improve alignment, so we can ignore them since the analysis will focus on the primary 46 human chromosomes.
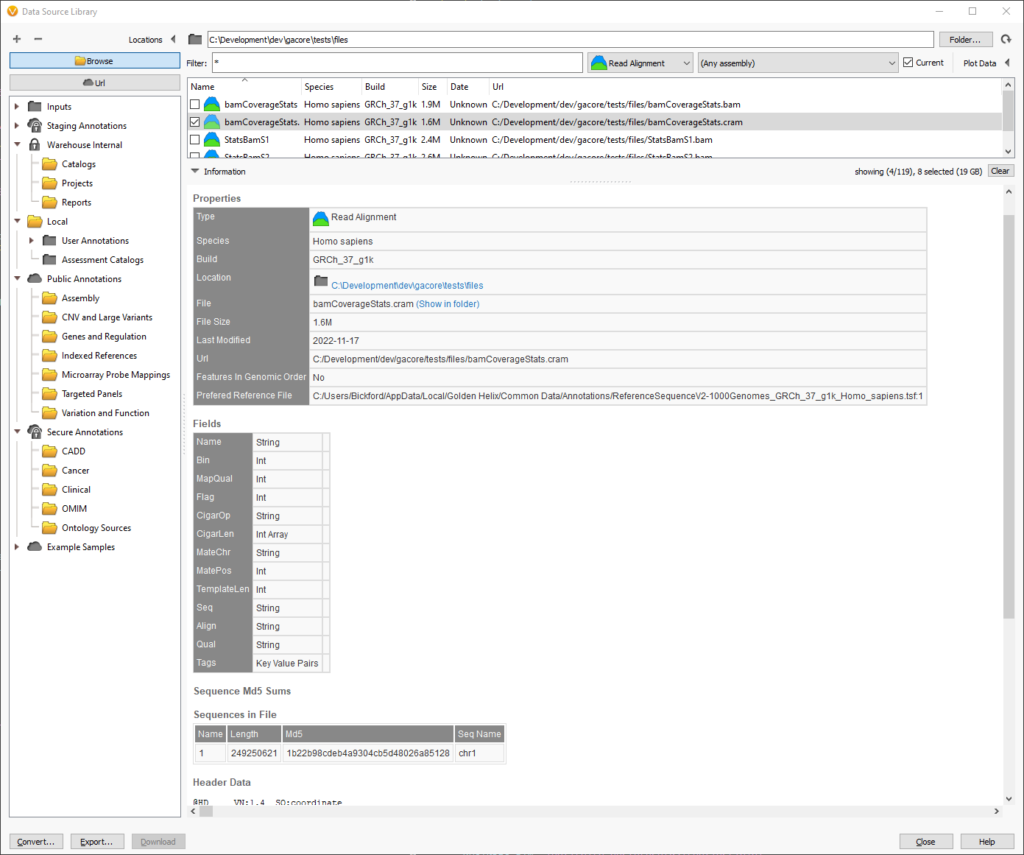
Scrolling down in the source information, we can find the reference file that will be used when reading a CRAM in the Properties section. The path to the reference file is the last item in the table. In this example, there is only a single chromosome in the CRAM file.

At the bottom of the screenshot, the “Sequences in File” section displays all of the chromosomes and their corresponding length and checksums. This information is pulled out of the header of the CRAM file and can be helpful when verifying which reference sequence was used to create the CRAM file.
As long as the reference file can be found for the CRAM file, VarSeq treats these files just like any other alignment file. They can be associated with samples on import, allowing them to be plotted and used as inputs to the coverage algorithms. If you run into trouble getting using CRAMs in VarSeq, hopefully, the above provides some good starting points to track down missing references; if not, please feel free to reach out to [email protected] for additional help.
