Over 650 GenomeBrowse licenses have been registered and downloaded since the beginning of 2015, and with so many people enjoying the utility of this freeware program, I wanted to showcase some advanced tips and tricks so you can get more out of GenomeBrowse!
Under the Controls panel, when you’re clicked inside a data plot, there is a “Filter” tab. This filtering option allows you to filter your data to create visualizations for publication or to manually inspect your data. Here I’ll take you through how to use this function to get the most out of your data and GenomeBrowse. First we’ll look at the options for filtering a BAM file.
Under the “Filter” tab in the control panel for a BAM file, there are four options for filtering the visible read alignments. Perhaps the most helpful is the option to Filter Multi-Mapped Alignments that allow the user to specify the Mapping Quality Threshold. Below you can see an area of the genome with many reads that have not been uniquely mapped with a moderately high threshold of Q50 vs a low Q5. The cross hatching in the upper panel identifies these reads as being hidden based on this quality filter threshold and they are not visible in the individual read plot. Another option for filtering that is similar, but distinct, is the option to filter Duplicate Alignments. These are reads marked as “PCR or optical duplicate” within the BAM file.
Link to BAM file format: https://samtools.github.io/hts-specs/SAMv1.pdf
Figure 1. Before strict Quality Filter, Q5.

Figure 2. After Quality Filter set to greater than or equal to Q50.
The next file type we’ll discuss is a VCF file and the various filtering options available.
Here I’ll discuss a standard VCF file and the fields annotated in the file. These fields are
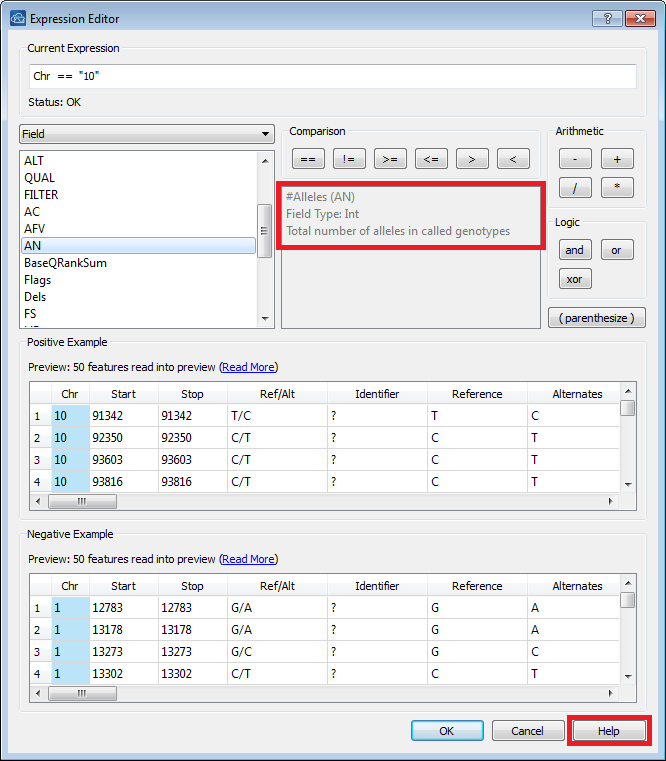
categorized by type and not all field types will be able to be used as a filtering criteria. Fields that have comma or semicolon separated lists or are identified as an “Array” cannot be used for filtering currently. If you’re not sure what type of data is contained within your VCF file, the Expression Editor under the Filter tab contains this information. The Expression Editor opens up when you click on “Insert” under the Filter tab. Figure 3 below shows where you can find this information, click on the field of interest, and that field type will be displayed in the right panel in the Expression Editor. For example, in the image below, the “AN” field contains integer values.

Figure 3. Expression Editor Window.
Link to standard VCF file format: http://samtools.github.io/hts-specs/VCFv4.2.pdf

Figure 4. Top image before filtering, bottom image after filtering and showing sample BAM file.
As you can see from the before and after images in Figure 4, the heterozygous insertion called in the VCF file was removed from the dataset because it was only seen in three reads of the BAM file. The minimum depth is set to 10 reads even though the mapping quality is Q60, so in this case the variant did not pass the Read Depth filter. You can also mix and match various types of data. As you see in the lower image, I’ve plotted the Quality by Depth and Quality Metrics from the VCF file to compare against the Variant Map, Figure 5.

Figure 5. Viewing multiple data types for comparison.
Another common field in a VCF file is the Number of Alleles. This field simply counts the number of alleles that were called in the sample or amongst all the samples in a multi-sample VCF. When this is used as a filter, you can eliminate missing data by setting the number of alleles you want to see. In the image below, Figure 6, with 5 individuals the maximum number of alleles is 10. So to see variants that were called in all 5 individuals, eliminating all missing genotypes, I set the threshold to 10. You can see the gray lines in the top plot are removed, as gray is a visual cue that indicates a missing genotype for that individual at that marker.
One additional filter I have implemented in the image below is to just show chromosome 10, seen in the left Control panel (there is an expanded view of this in Figure 7). Filtering by chromosome requires the quotations on either side of the chromosome number because it is considered a type string field. An example of this is also in the GenomeBrowse Manual, which you can access easily through the Expression Editor’s window. In the lower right corner is a “Help” link which will take to that exact location in the manual, Figure 3.
Figure 6. Filtering out missing genotypes.

Figure 7. Only visualizing chromosome 10, high zoom level.
Another multi-sample VCF filter that may be beneficial in creating visualizations for a presentation or just for exploring your data is viewing one sample at a time. This can be accomplished through the second frame inside the Control panel Filter tab called “Filter by Sample.” Insert a filter here and the expression editor opens, but you have fewer filtering fields to use, basically, only the sample names. This field type is a string and also needs quotations to finish the expression. Make sure the sample name matches exactly otherwise the filter will not work, Figure 8.
Figure 8. Filtering VCF by sample, only Sample “SRR1024173mapings” is visible after filtering.
These are some of the basic filtering options available for a standard BAM and VCF file, but VCF files with additional annotated fields, such as 1kg, HapMap, or a custom field can also be used to visually filter your VCF file in GenomeBrowse. If you have an annotated VCF file with additional fields you’d like to visualize and need help filtering it in GenomeBrowse, the Support Team at Golden Helix would be happy to assist you! Email us: [email protected]
If you’d like to try Genome Browse out for yourself, here is a link to download it today! https://www.goldenhelix.com/GenomeBrowse/


