
…so we added some automation to your automation so you can automate while you automate!
Automation has been a hot topic recently and for all the right reasons. As we (proudly) watch our customers increase their sample and data volume, we are constantly seeking to provide tools to reduce click rate and optimize throughput. Furthermore, with all of the new resources we are providing our customers, such as Golden Helix CancerKB and our upcoming oncogenicity scoring algorithm to enhance somatic analysis and evaluation script capabilities and the ability to import, annotate, and analyze structural variants on the germline side, automation capabilities are becoming increasingly important and widely-adopted.
In our most recent blog, we expounded upon the current offering of shipped evaluation scripts in VSClinical ACMG. Paired with our tutorial on investigating and editing these scripts, users have the tools to tailor their VSClinical ACMG workflows to their own unique needs. Of course, the adept user will already be contemplating the next level of automation. While we’ve teased the ability to fully automate a FASTQ to report pipeline and shown off some additional tools for automating custom output, we’d like to share some additional tools on how to put it all together with VSPipeline, our command line automation tool.
We’ve talked a lot about VarSeq’s versatility. We strive to create a product absent of black boxes and opaque workflows and give our users complete freedom to decide when, where, and how they interact with their pipelines. The ability to integrate evaluation scripts into VSPipeline fully maximizes the granularity of that goal. Using VSPipeline, users now have complete latitude to decide their points of ingress and egress into a VarSeq project. This granularity is mostly facilitated by the VSPipeline commands set_current_workflow and run_workflow_script. In short, these allow users to replicate the steps of beginning an ACMG or AMP evaluation and carrying out any degree of interpretation and evaluation of germline and somatic variants, respectively, via evaluation scripts. Of course, users are always able to review and reanalyze results at their discretion. Let’s take a look at these commands, bearing in mind that they would likely be called as part of a shell script defining an overall VarSeq workflow.
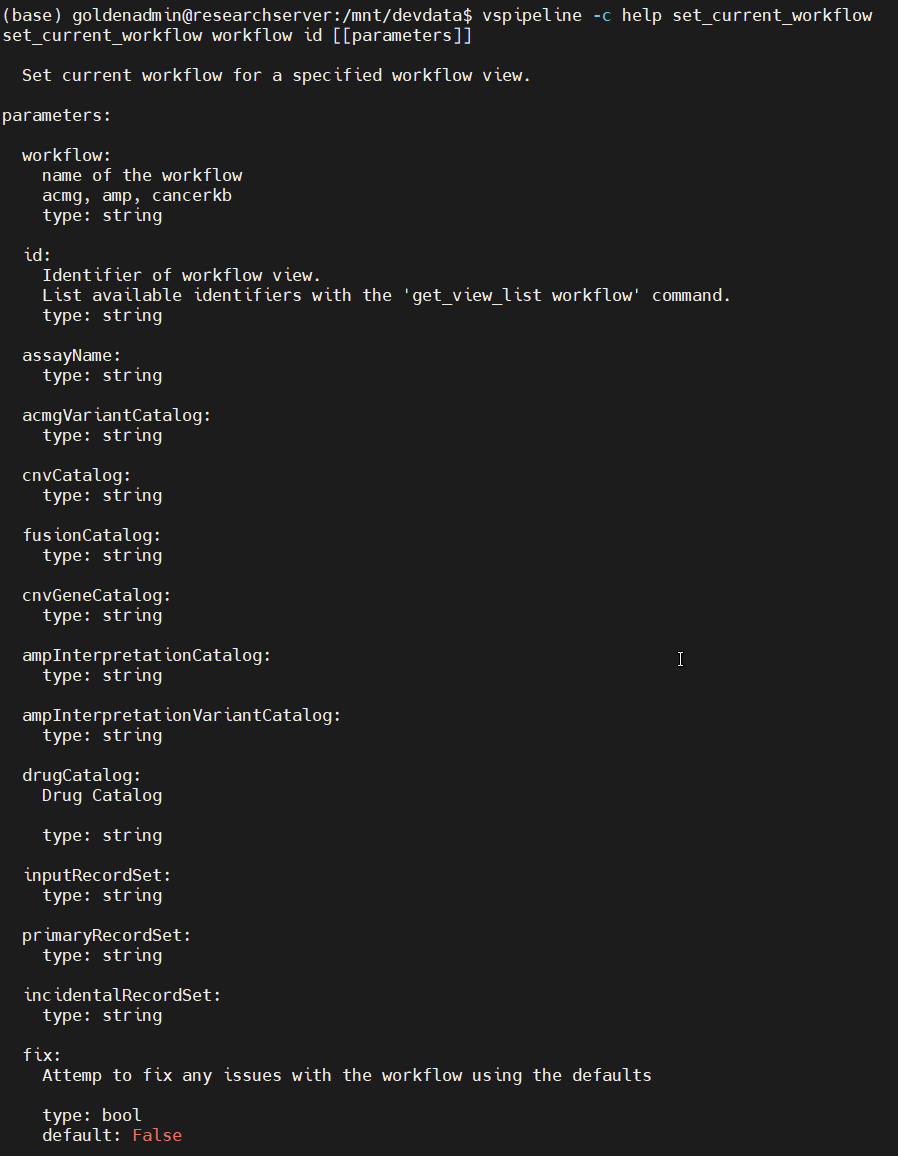
set_current_workflow help message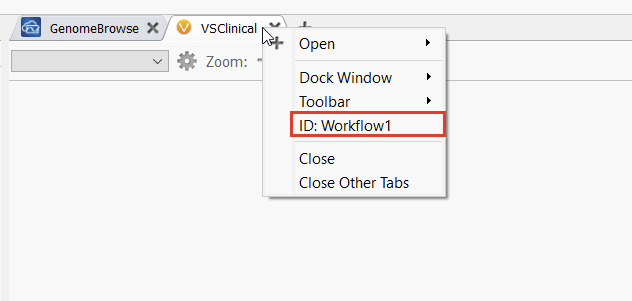
First off, set_current_workflow: as one might guess, this lets users enter the ACMG or AMP workflows in VSClinical, the command line equivalent of switching tabs in the VarSeq GUI. Running vspipeline -c help set_current_workflow gives us a helpful usage message (Figure 1). We can see that this command takes two required arguments, workflow and id. For the first, we can choose acmg or amp. The second is the ID of the tab we want to open. This is defined by the VarSeq project template we are using, and can be found and edited by right-clicking on any tab in VarSeq (Figure 2). Additional optional arguments let us define the assessment catalogs the workflow should reference, which is useful for providing consistent inputs and outputs to the workflow.
In a production setting, this command will usually reside in a shell script after creating a project, importing samples, and waiting for all algorithms and annotations to finish. While these steps alone massively reduce manual work and increase throughput and efficiency, adding workflow scripts only further reduces click rate and more efficiently leverages the diverse resources available to users in VSClinical AMP and ACMG. The VSPipeline component of a shell script might look something like this:
vspipeline -c project_create path="example_project" template="example_template" \
-c import files="example1.vcf, example2.vcf" \
-c download_required_sources \
-c task_wait \
-c set_current_workflow workflow="acmg" id="Workflow1" \
...
With that out of the way, the ... in the above code is where the magic happens. This is where we can leverage evaluation scripts using the run_workflow_script command (Figure 3). As the usage message (vspipeline -c help run_workflow_script) indicates this command lets us perform additional work with evaluation scripts, its sole required argument being a path to an evaluation script.
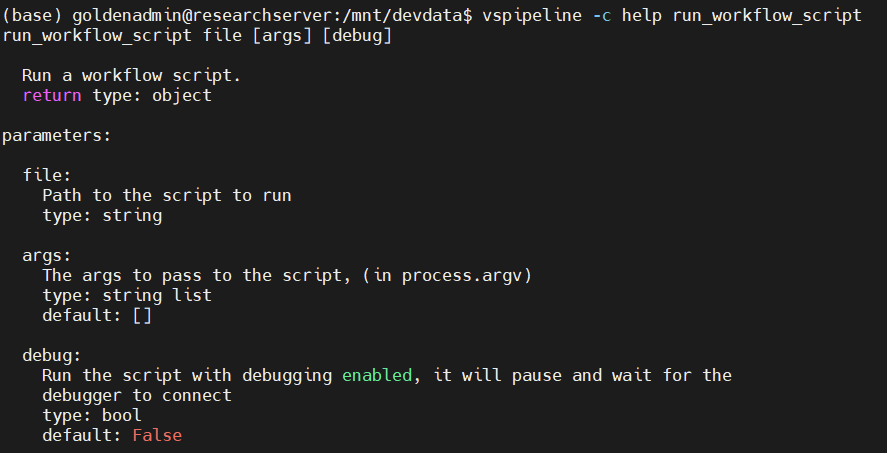
run_workflow_script help messageReferencing our previous blog, out of the box, these are already fairly comprehensive. For instance, calling the “Import Project Variants, CNVs, and Fusions” evaluation script would automatically add all filtered variants to an ACMG evaluation. If this is the only script being run, the time and click rate are already reduced, yielding a project ready for variant evaluation. However, this is only the tip of the iceberg. With the available evaluation scripts alone, users can additionally add disease and phenotype information from a JSON and remove benign variants, netting a project completely ready for variant interpretation and report rendering. The more ambitious user can go so far as to even automatically render the report itself, making the first step of analysis simply reviewing a fully-rendered custom report to be signed off on or further investigated. VSPipeline’s command-line automation integrates directly with VarSeq’s clinical reporting capabilities, so every step from sample import to final report can run without manual intervention.
All of this can be done with the default evaluation scripts and VSPipeline. Users interested in maximizing efficiency and increasing throughput while reducing click rate should certainly use these as a starting point. JavaScript experts will be able to go several steps further with our previous blogs on editing evaluation scripts as a reference, fully customizing automated workflow steps. If “JavaScript expert” isn’t quite you, don’t worry: contact [email protected] and we’ll be happy to get you started. We look forward to supporting you in any way we can on your automation journey.